Updated on January 16, 2024
How to Pick the Right Painting Supplies
From paint brushes and rollers to drop cloths and trays, the right painting supplies can make a difference in any paint project. Read our guide to learn more!
Make Sure You Have All the Paint Tools You Need
Paint Brushes
1Choose the Right Brush: Types
Paint brushes come in 2 main types:
Material | Paint Types | |
Natural-Bristle Brushes | Made with real animal hair | Oil- or alkyd-based paints (no water-based paints) |
Synthetic-Bristled Brushes | Made with synthetic materials like polyester, nylon, or a combination of the two | All types of paint |
It’s a good idea to always check the manufacturer’s recommendations for the paint brush you are using.
A 4” brush for coverage and a 2” brush for trim work and corners are sufficient for most paint jobs.

2Choose the Right Brush: Size and Shape
It's possible to use the same brush for all applications, but you'll see: with the wrong brush, the work is likely to take much longer and be more difficult in some places. Here's how to choose the right brush for the area to be painted:
Size
Surfaces | |
1-2" | Windows and other small mouldings, finishing work, corners |
2.5” | Large mouldings, cabinet doors, wall and ceiling trimming work |
3-4” | Walls, doors, furniture, shelving |
5-6" | Large flat surfaces (large walls and garage doors) |
Shape
Surfaces | |
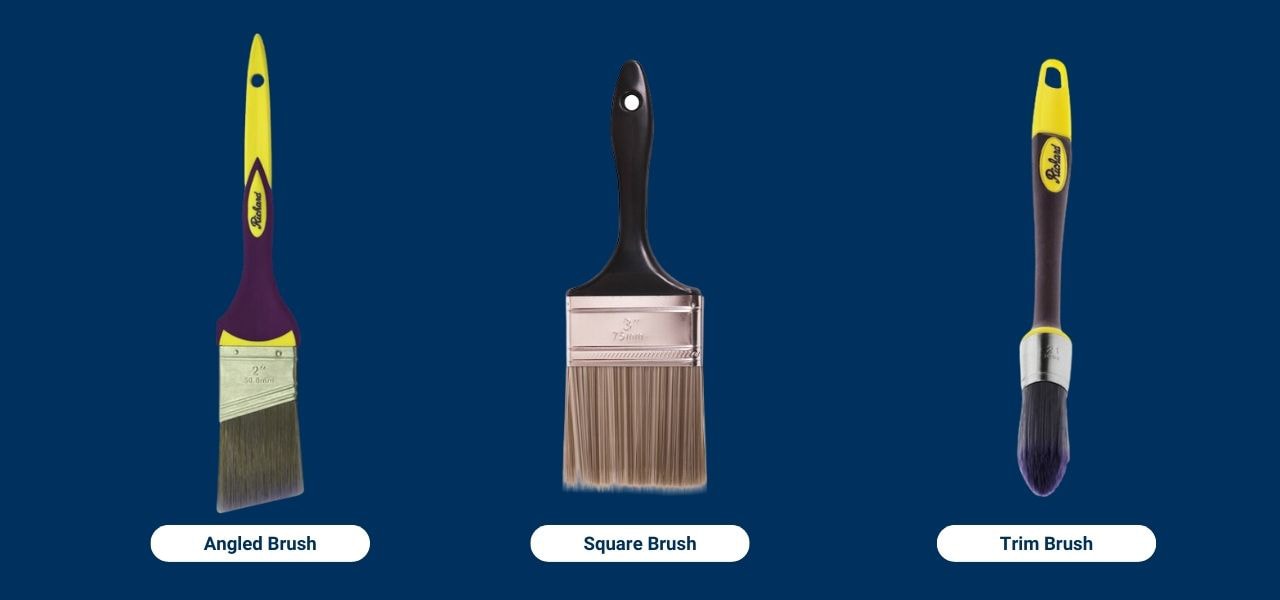
Angled | Corners, mouldings, finishing/precision work |
Square | Larger surfaces requiring less attention |
Trim | Precise trimming of frames, mouldings, and other hard-to-reach areas |

3Choose the Right Brush: Handles
- Long, Very Slim Handle with Pointed Tip: Ideal for precision work, it can be held like a pencil.
- Long, Slim Handle with Rounded Tip: It sits comfortably in the hand and can be used for a wide range of applications.
- Standard-Length Handle, Curved in the Middle: The most comfortable model, used for painting large surfaces.
- Short Handle, Curved in the Middle: It fits in the palm of your hand and is very handy in tight spaces where a longer handle would be in the way. This shape is typical of stain brushes.
There are even curved (or “goose neck”) handles for painting in hard-to-reach areas. Of course, personal preferences also come into play, as comfort is an aspect not to be overlooked.

4Choose the Right Brush: Quality
Some tips for finding a good brush include:
- Inspect the bristle tips. A natural-bristle brush should have split tips and a synthetic brush should have fuzzy-looking tips.
- Choose brushes with tapered, chisel-shaped bristles rather than flat ones.
- Tap the stainless steel or aluminum band on the brush, known as the ferrule, and see if any bristles fall out. The ferrule should be wrapped tightly enough to keep the bristles secure. Check that the ferrule isn’t rusty as well, as this can alter the paint’s colour.
Smart Saving Tips
Better quality brushes give higher-quality results, but for an inexpensive option that eliminates cleanup, consider disposable brushes.
Some Useful Paint Brush Tips
- Synthetic brushes should be dampened before starting to keep the paint from drying.
- To help prevent waste and ensure a smooth application, don’t overload the brush with paint.
- Hold the brush at a 45° angle for maximum contact with the surface area.
- Start each paint stroke from an area you just painted towards an unpainted area. This is known as “wet to dry” and provides a smoother finish.
- Only dip the bristles one third of the way into the paint to prevent waste. Remove excess paint by tapping the brush side on the inside of the can.
- If you need to take a painting break up to about an hour, then place the brush into the paint so that the bristle tips are covered. For longer breaks, use aluminum foil or plastic wrap to cover the bristles. Store the wrapped brush in the refrigerator if you are using latex paint or in the freezer if you are using oil-based paint.
- Before you clean a brush, make some strokes on a piece of newspaper to remove excess paint. Use a proper paint thinner to completely remove the paint before storing it away.
Paint Roller Covers
Whatever the type, material, width, and pile depth, make sure there are no visible joints that would make the finish uneven. And don't forget: a poor-quality roller will produce poor results!

1Choosing the Right Roller: Types
- Woven Rollers Covers (Including Microfibre): They offer a smooth finish and produce less lint. They produce an even coverage with any type of paint.
- Knit Roller Covers: By retaining and releasing more paint, they provide more even coverage more quickly. They are the best option for primers, stains, and sealers.
- Foam Roller Covers: They produce a very smooth finish and are suitable for all types of paint. They are generally less durable than woven and knit rollers.
2Choosing the Right Roller: Material
The choice of material (or type of fibre) depends on the type of paint to be used and the desired sheen, but also on the surface to be painted:
Material | Paint Types | Surfaces | Sheen | Other Characteristics | |
Synthetic Roller Covers | Nylon, dacron, or polyester | Latex and acrylic | Very smooth and smooth | All sheens | Very durable |
Natural Roller Covers | Mohair or lambswool | Oils and alkyds | All surfaces | All sheens | High pickup capacity |
Blended Roller Covers | Polyester and wool | All paint types | All surfaces, but especially porous surfaces | All sheens, but especially high-gloss finishes | Highly durable, with large pickup capacity |

3Choosing the Right Roller: Size
- Mini Rollers (4-6"): ideal for tight spaces and for painting mouldings, door frames, railings, furniture, kitchen cabinets, etc.
- Standard Rollers (9"): ideal for most walls and ceilings.
- Wide Rollers (10-18"): ideal for large walls and ceilings, but also for floor coatings.
4Choosing the Right Roller: Pile Depth
The length of the roller’s painting surface, known as the nap or pile, can vary from 1/16” to 1 1/2”. The surface to be painted and the desired sheen dictate which thickness to choose.
In a nutshell:
| Surfaces | Sheen |
Low Pile Depth (3/16-1/4”) | Very smooth surfaces, such as mouldings and cabinet doors, as well as metal | Semi-gloss and gloss |
Medium Pile Depth (3/8-1/2”) | Smooth or semi-smooth surfaces, such as walls and ceilings | Satin |
Think Pile Depth (3/4-1”) | Semi-rough surfaces, such as wood and stucco | Matte |
Very Thick Pile Depth (1 1/4-1 1/2”) | Rough surfaces, such as concrete, brick, and masonry | Matte |
Note that some “faux finish” rollers come with a textured pile for a special finish and unique look. They lend the wall a textured look that can even be used to cover up small drywall imperfections.
Pro Tip
If you notice that the finish is too textured when you apply the paint, consider using a thinner roller cover.
Some Useful Paint Roller Tips
- The metal frame is available in a solid metal or a birdcage design. For fast-drying paint, choose the birdcage frame, as it is easier to clean. You can attach an extension to most handle types as well.
- Before you begin painting, it’s always recommended to check the manufacturer’s instructions.
- Use water or thinner to moisten the roller before use. This will help keep the paint from drying out.
- Load the paint onto the roller from the tray’s slanted edge to avoid overloading.
- Paint in a “W” shape, initially moving the roller away from you. Fill in the rest of the open space without lifting the roller.
- Have patience—don’t paint too quickly.
- Clean your roller cover by rolling it on some newspaper and use paint thinner to completely remove the paint. Make sure to wear rubber gloves and allow the roller to dry fully before storing it away.
- If you don’t have any other painting projects in the near future, consider using disposable rollers. These can make cleanup a breeze, especially for oil-based paint.
Pro Tip
Trim rollers offer a large selection of sizes and shapes. A doughnut-style roller is an ideal choice for detailed work like mouldings. For the inside of corners, go with a cone-shaped roller.
Paint Pads

Types of Power Painters and Sprayers
Here are the main types available:
- Pneumatic Units: They use compressed air to spray the paint, which means that you’d need an air compressor. Paint also needs to be thinned to avoid waste or clogging.
- Airspray Units: Also known as HVLP (high volume low pressure) units, they combine a large quantity of air with the desired covering material. The low pressure allows smooth coverage with very little overspray. They're best used for smaller areas where a glossy smooth finish is desired, such as shutters and cabinets.
- Airless Units: The most common type for the DIYers, paint is pushed under high pressure through an applicator tip, eliminating the need to reach for a bucket or tray to reload. Since the pressure is provided by a pump rather than air, overspray and waste are reduced. Airless sprayers are great for painting walls or other large areas, as well as smaller areas.
- Diaphragm Pumps: The basic homeowner/DIYer models use a simple diaphragm pump. The gravity feed ensures a smooth finish.
- Piston Pump: A piston pump enables the user to spray conventional coverings but can also deliver thicker liquids, such as block fillers.
Here are our top power painter and sprayer tips:
- You’ll need some practice before using a power sprayer for the first time. Take a piece of cardboard and try to keep your hand steady while holding the applicator parallel to the area you want to paint.
- Drop cloths are a smart investment that will help keep your cleanup and rework to a minimum.
- Sprayers come in different sizes and power ratings for different purposes. Some models, for example, are only compatible with stains.
Caution
While sprayers do provide the best coverage, they also waste more paint. The sprayed paint also dries more quickly and can cause the nozzles to clog. When the project is done, expect to clean all the parts.
Other Painting Accessories
- Drop cloths will not only save you on cleanup time, but they will help protect your flooring and furniture from paint.
- A tray is an essential accessory when painting with a roller and it comes in handy with a painting pad as well.
- Don’t jump into a project without painter’s tape, and make sure you are using painter’s tape rather than masking tape. Unlike masking tape, painter’s tape can stay on for up to 3 days without damaging the finish when you pull it off.
- For safe and easy painting, a ladder and a proper step stool are a must-have.
- The easiest way to make clean cut-ins on ceiling corners is with the simple straightedge of an edger or painter’s shield.
- If you need a longer reach, use an extension handle. The extender should be stiff enough to provide proper leverage for paint application, and it will need to be attached to a roller with a screw-in extender.
Now that you are familiar with painting tools and accessories, check out our guide Interior Paint: From Selection to Application to help you choose the right type of paint for the project as well!


