Build a treated-wood fence

For those who value privacy in their own backyard, a fence is the best answer. Versatile, durable and low-maintenance, treated-wood fences are extremely popular and easy to install.
Difficulty level: Intermediate
Duration: Weekend project
Download the construction plan
Codes and Regulations
Every municipality has its own codes and zoning regulations. Contact your local building department to find out if you need a building permit.

Consult Fencing: Planning and Installation. This guide explains what you need to know about soil conditions, obstacles such as trees and fences, and the importance of respecting property lines, easements and encroachments.

Determine the location of the fence and install the foundation

Read The right foundation for your fence: choose and install. It will explain how to mark the location of the fence posts and how to choose the foundation that suits the type of soil in your backyard. For more information, our guide to property fencing planning and installation is very useful.

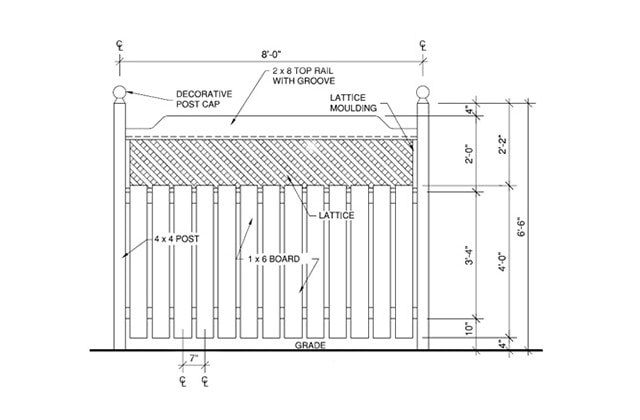
Elevation of the treated-wood fence panel with lattice
1

Calculate and prepare materials

  • 1.1 - Calculate the total length of the fence. Plan for one section and one post per 100", and an additional post to complete the fence.
  • 1.2 - Prepare your materials for each section:
    • 1 post, 4" x 4" x 10ꞌ
    • 2 rails, 2" x 4" x 96"
    • 1 border, 2" x 8" x 96" with a groove
    • 13 boards, 1" x 6" x 60"
    • 1 lattice panel, 24" x 96"
    • 1 lattice moulding (“U” shaped), 96" and 2 mouldings, 16”
  • 1.3 - Cut the upper corners of the 2" x 8" x 96" border in the shapes suggested.
  • 1.4 - Use a router to cut a groove along the bottom section of the border, ½" deep and the same width as the thickness of the lattice. The groove should be perfectly centered.
Install hangers and rails for the treated-wood fence
2

Install the hangers and rails

  • 2.1 - Mark the location of the lower hangers approximately 12" from the ground if the ground is completely level.
  • 2.2 - Check that the location markers are level and the same height.
  • 2.3 - Mark the location of the upper hangers 3' above the marks made for the lower hangers.
  • 2.4 - Screw the joist hangers to each post on both sides, at the top and bottom.
  • 2.5 - Insert the 2" × 4" rails in the joist hangers between the posts and screw in. The vertical fence boards will be screwed to these horizontal rails.
Install the lattice moulding on the rail and upper section of the fence posts.
3

Install the lattice moulding

  • 3.1 - Secure the 96" lattice moulding horizontally to the upper rail, and screw through the groove.
  • 3.2 - Press the two lattice mouldings on the posts by pressing down on the preceding moulding, then screw.
Install the fence boards and lattice border.
4

Install the boards and lattice

  • 4.1 - Screw the boards to the top and bottom rails.
  • 4.2 - Use a template to space the boards 1½" apart, or less if desired.
  • 4.3 - Fill in the area between two posts.
  • 4.4 - Place the border over the lattice in the groove, then nail it to the posts at a 45° angle.
  • 4.5 - Install decorative post caps.

Suggested products