Choosing a Biscuit Joiner

A biscuit joiner is a power tool equipped with a circular saw blade for cutting slots in wood to fit biscuits used for making joints. Also known as a plate joiner, this woodworking tool cuts crescent-shaped holes in the opposite faces of two pieces of wood. A biscuit is a thin dowel made of compressed wood and used for joining slotted workpieces. Woodworkers with biscuit joiners can make elegant furniture with hidden joints. Besides aesthetics, a plate joiner makes joining boards easier and faster and improves accuracy.

Types of Biscuit Joiners to Choose From

One way to classify these power tools is by handle style. Manufacturers offer plate joiners with barrel grips or D-handles.

A barrel grip extends the tool’s body, while a D-handle mounts on its motor casing. A barrel grip offers a larger grip area and better control of the tool. You can manoeuver the joiner more easily when wrapping your hand around a barrel grip.

If you plan on working with a biscuit joiner for long sessions, it’s best to consider getting a D-handle model. The D-handle provides a more ergonomic grip and is comfortable to hold for extended periods.

Plate joiners are also available as corded and cordless power tools. Corded units have more powerful motors and can cut faster. They also run for longer since they don’t rely on battery power. In contrast, cordless biscuit joiners are more portable and better suited for field work and small projects. When using one, there’s no risk of the power cable getting in the way. To reduce downtime, it’s best to have extra batteries handy.

Biscuit Joiner Parts to Know Before Buying

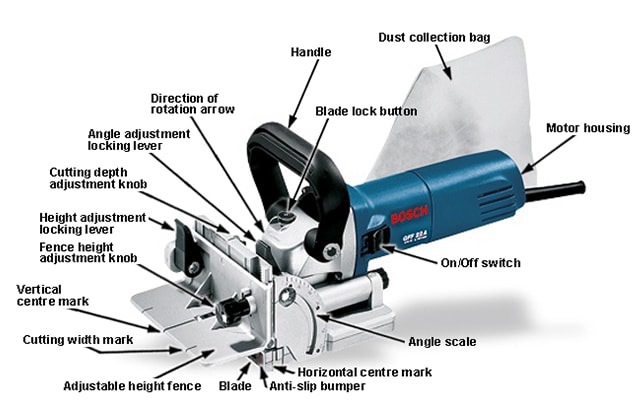
Knowing the various parts of this power tool is an important first step in understanding how a biscuit joiner works.

Handle: This is the part of the tool gripped by the user. It’s required for holding, carrying, and controlling the joiner.

Motor: An electric motor drives the cutting blade of a biscuit joiner. This can either draw power from a rechargeable battery or from a cable connected to a wall outlet.

Power Switch: For turning the machine on and off.

Blade: A circular cutting disc with six to eight teeth. It moves out of its guard when the tool presses into a workpiece and retracts upon raising the machine.

Blade Lock Button: Locks down the blade and prevents it from rotating during blade changes.

Cutting Depth Adjustment Knob: Along with a fine-adjustment screw, it adjusts the depth of the blade’s cut. Users can choose a cutting depth according to the size of the biscuits they intend to use.

Fence: A guard that rests on the workpiece and steadies the plate joiner. It usually has markings to make adjusting its height and angle easier.

Horizontal and Vertical Center Marks: These biscuit joiner parts show the horizontal and vertical centres of the blade. They denote the centre of its thickness and centre of its axis, respectively.

Cutting Width Mark: Indicates the width of the blade when fully exposed. This information makes it easier to estimate the required spacing between biscuits.

Direction-of-Rotation Arrow: An engraved arrow that shows the direction of rotation of the blade.

Anti-slip Bumpers: Keeps the biscuit joiner planted and prevents it from slipping while cutting slots.

Features to Consider When Selecting a Biscuit Joiner

Understanding the key features to look for in a plate joiner is important when comparing different models of the tool. This knowledge will also come in handy when learning how to use a biscuit joiner.

Motor Power: Like other power tools, manufacturers quote the power ratings of corded plate joiners in ampere (A) and use volt (V) for cordless units. A corded joiner with a power rating between 5 A and 7 A is ideal for most DIY joinery tasks. This can cut through softwood and particle board and may be able to tackle harder materials. If you prefer a cordless plate joiner, a 14-volt model provides the same performance. Hardwoods and professional workshops need joiners with more powerful motors

Blade Size: This describes the diameter of the cutting blade. The standard biscuit joiner blade is a 4-inch cutting disc. It cuts slots for commonly used biscuit sizes. Having a 2-inch blade allows you to cut smaller slots for smaller biscuits.  

Cutting Speed: This is related to the motor power of the tool and describes the spinning rate of the blade. Most corded plate joiners have cutting speeds between 10,000 and 11,000 revolutions per minute (rpm). This is fast enough to cut through hardwood. High-speed blades also produce clean and smooth cuts in materials prone to splintering.

Adjustable Fence: Having a biscuit joiner with a fence that can adjust to 45 degrees and 135 degrees makes cutting more convenient. With fences that only tilt to a 45-degree angle, you may need to flip the workpiece to cut it on both sides. A fence that adjusts to both angles saves time and makes cutting mitre joints easier.

Dust Collection: Plate joiners produce a lot of sawdust and most include dust bags to help keep the work area clean. Some models have dust ports that can connect to workshop vacuums.

Pro Tip

Opting for a biscuit joiner that accepts both 4-inch and 2-inch blades means you'll have the right tool to cut slots for tiny biscuits if you ever need them.

Instructions for Using a Biscuit Joiner

With the right instructions and some practice, DIYers can use plate joiners to build joints for cabinets, drawers, and frames. Most biscuit joiner uses follow the same basic steps.

The first step is placing the two boards you’d like to join on a worktable. Marking the spots with a pencil where you want the biscuits to go makes aligning cut holes quicker.

A few helpful biscuit joiner tips and tricks to remember:

  • Working with one board at a time makes things easier
  • Applying a couple of drops of dry lubricant in the space between the motor assembly and the tool’s base helps the parts slide better
  • Having a simple jig to complement the fence at locking down the workpiece improves cutting accuracy

After placing the fence on top of the board and lining up the tool’s cutting guide with your pencil marks, then it’s time to switch on the biscuit joiner. For precise cuts, it’s best to set the blade’s cutting depth beforehand. In this way, the blade sinks into the workpiece up to the stop line. After cutting slots in all marked spots and both boards, you can apply the glue.

Placing the adhesive in the slots on one board keeps the completed joints from looking untidy. For the same reason, the biscuits should go in the glued slots before sliding the second board over. Most woodworkers clamp both boards together to allow the glue to set and dry.

Pro Tip

It’s best to keep the clamp closed but not clenched in order to avoid squeezing wet glue out of the biscuit joints.  

Accessories to Have When Working with Biscuit Joiners

Blades and biscuits are the most important accessories to have on hand when using a plate joiner. Biscuits come in various sizes, but the most common ones are #0 (for wood pieces that are 8 to 12 mm thick), #10 (for 12 to 15 mm wood pieces), and #20 (for workpieces measuring over 15 mm in thickness). While most of them are wood, there are some plastic and PVC biscuits and even metal connectors used for the same purposes.

Besides blade size and tooth count, the material used for the teeth is another important feature to consider when shopping for these biscuit joiner accessories. Carbide is the most common material used. It’s durable, and capable of slicing through hardwoods.

Other accessories to consider for your biscuit joiner kit include glue, dust collection hose, and joint-spacing bars to help create slots at regular intervals.

Suggested products