Viktor Sarudi
Woodworker

How to Make a DIY Outdoor Wooden Christmas Tree

They say, “go big or go home.” This Holiday season, why not do both? Let’s go big AT home! I’m Vik and I run The Stump Shop out of Newmarket, Ontario, where I make cool stuff out of wood. Join me as I partner with RONA to build a huge 9’ tall Christmas Tree to light up your Holiday season. The best part about this tree is, if you can fit it in your house, it can also be an indoor décor piece. If it’s too large, it can be an awesome outdoor piece of Holiday decoration.

Pro Tip

Right before starting any build or project, I gather all the materials, tools and supplies required. I clean out the workspace as much as possible, clearing items from other projects, and lay everything out. I find this makes the build easier, quicker and more organized.
1

Measure and Cut Your Wood Planks

  • 1.1 - Cut one end of two separate 2 x 4 x 8’ at a 67.5-degree angle. This forms the sides of the tree. This is done easiest with a jigsaw.
  • 1.2 - Lay the 2 x 6’ down and attach the angled end of the 2 x 4’s to each narrow edge to form a triangle shape. Secure with wood screws through the narrow edge.   
2

Assemble the Shape of the Tree

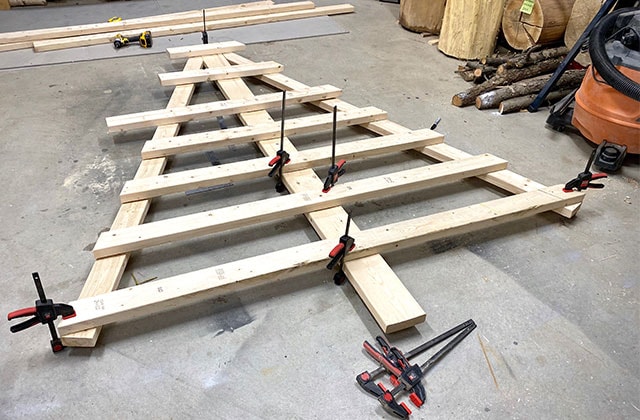
  • 2.1 - Cut eight 2 x 4’s to the lengths listed below. The ends are cut at a 22.5-degree angle using a mitre saw. Once the pieces have been cut on both ends, lay them across the 2 x 6’ starting 12” from the bottom, then every 8” until reaching the top. Start with the longest piece first, forming the base of the triangle of the Christmas tree, then ascending upwards.

    Cut list: 
    75” 
    66” 
    56” 
    47” 
    37” 
    28” 
    18” 
    9” 

  • 2.2 - Apply wood glue to all the joints. Make sure the pieces are centred and level when attaching.
  • 2.3 - Using wood glue and clamps, secure the wood in place so the entire piece can be lifted off the ground once dried.
3

Stand the Wooden Tree

  • 3.1 - Once the wood glue has dried, lift up the entire tree and secure from the back with 2½” screws into each joint
  • 3.2 - Drive one 2½” wood screw into each joint from the back so that there are no screws visible from the front. This reinforces the wood glue.
4

Attach the Tree Base

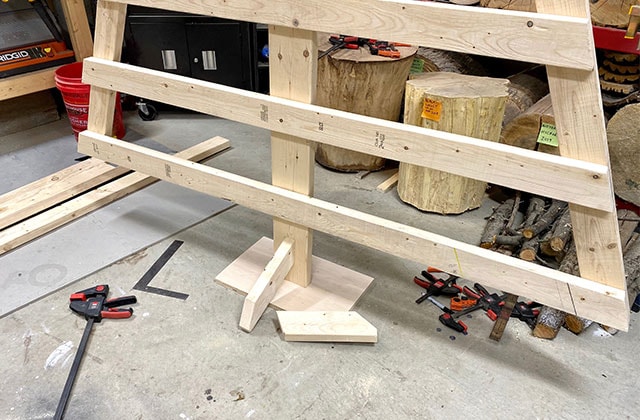
  • 4.1 - Attach one of the 16 x 16” square plywood pieces to the bottom of the tree with two screws from underneath. To make this easier, I had to lay my tree across a couple of sawhorses so I could access the bottom. Cut two support pieces and butt them up against the base of the tree for support. Attach with screws.
  • 4.2 - It’s really starting to come together!
5

Sand the Tree

  • 5.1 - Sand the entire tree. Usually when sanding wood projects, I start with an 80 grit and work my way up to 220. In this case, because it is not fine furniture and to keep the project easy, one round of 120 grit will suffice.
6

Stain the Tree

  • 6.1 - Stain the 2 x 6’ “trunk” of the tree using the Varathane Dark Walnut wood stain.
  • 6.2 - Stain the cross 2 x 4’s using the Varathane White Linen wood stain.
7

Make the Tree Topper

  • 7.1 - Using the remaining 16 x 16” plywood sheet, cut out a star for the top of the tree. Spray paint the star using gold spray paint, or select a colour of your choice from RONA.
  • 7.2 - Alternatively, you can purchase Christmas tree décor at RONA and use that as a topper.
  • 7.3 - Attach the star to the top of the tree from the rear using wood screws.
8

Decorate Your Christmas Tree!

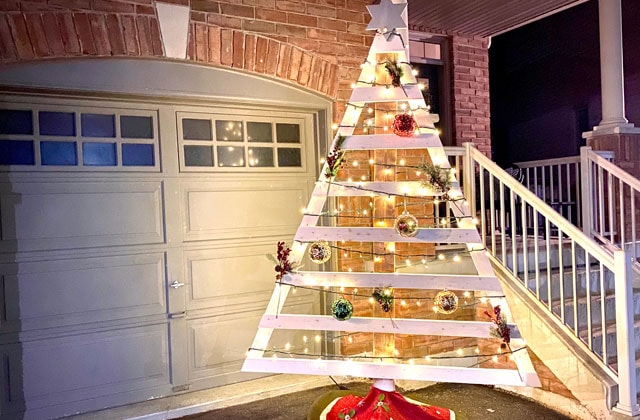
  • 8.1 - Time to decorate! Now that building the tree is complete, it is time to let your creative freedom flow.
  • 8.2 - String Christmas lights around the tree and plug in using the Luminations Light Wizard!
  • 8.3 - You can also add fake snow to the tree, attach garlands, hang ornaments or use a tree skirt. Do whatever you want to make the tree look perfect to you!

Enjoy Your Work!

Now you can sit back, relax and enjoy your tree! Good job! I hope you had fun building your huge Christmas tree and may you take on many more DIY projects! Happy Holidays!
Viktor Sarudi
Woodworker

Viktor Sarudi is a woodworker and podcast host based in Ontario. He creates DIY projects and shares tips on his Instagram account, @TheStumpShop.

Suggested products