Kitchen reboot: freshen up with a brand-new countertop

Tired of your old kitchen counter? Eager for a fresh look to wake up to in the morning? If it’s a dream kitchen you’re after, make this dream a reality! Think energized, bright and revived with a new laminate countertop. Not only are they durable, easy to maintain, wear-resistant and affordable, you can install them yourself. Available in a huge range of styles and patterns, so let your imagination lead the way.
Difficulty level: Intermediate
Duration: 6 hours
Tips

Precise measurements are essential. With that information, you can purchase kitchen counters with either flush or 45o mitred ends.

Cornered countertops are ideal for counters with near- perfect square edges.

Miter cuts are extremely difficult. If your corners are not square, have your countertop install by a professional.

When walls are out of square, choose a counter without an integrated backsplash, then install the backsplash separately.

1

Measure the dimensions for the counter

  • 1.1 - Check the corner walls for square (90o). Adjustments are possible up to ¼". If corners are out of square, it may be wise to call in a professional.
  • 1.2 - Check the walls for straightness. If walls are uneven, sloped, slanted or out of square, you may need to shape the backsplash. Adjustments are possible up to 3/8".
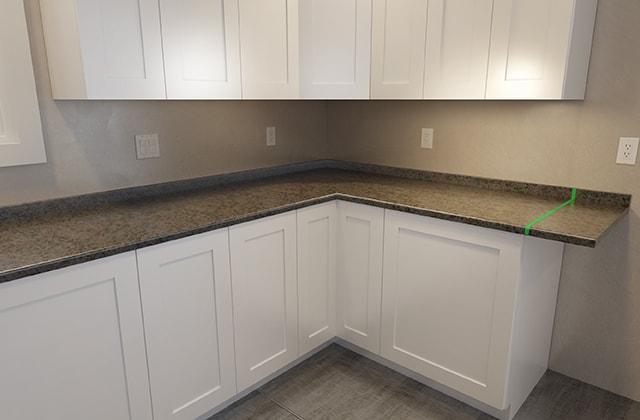
  • 1.3 - Measure the depth of your base cabinets: 23 ¾" is standard. The counter overhang must be included (¾" to 1") in order to calculate the countertop width to buy.
  • 1.4 - Measure the length behind and in front of the cabinets.
  • 1.5 - Ensure the backsplash will not conflict with any outlets on the wall between the base and wall cabinets or window trim.
  • 1.6 - Check the base cabinets for level.
2

Cut the countertop length

  • 2.1 - Place all countertop sections on the base cabinets firmly against the wall.
  • 2.2 - Make sure doors and drawers open freely. If they catch or rub, the countertop will have to be raised by screwing in build-up blocks or strips at 2ꞌ intervals.
  • 2.3 - Put a strip of masking tape on the countertop surface to mark where you will cut.
  • 2.4 - Turn over the countertop and mark the cut location. Verify and double check.
  • 2.5 - Screw in a cutting guide to ensure a straight cut. Be very careful not to cut through the finished surface of the counter.
  • 2.6 - Use a circular saw with a fine-tooth blade.
  • 2.7 - File the cut edge from top to bottom.
  • 2.8 - Cover the cut end with edgebanding.
3

Fit the countertops

  • 3.1 - Put masking tape on the top of the backsplashes and corners.
  • 3.2 - Place countertop sections on the cabinets in their final position. Fit the two corner sections together and adjust until they are flush.
  • 3.3 - Use shims to level and clamps to maintain in position.
  • 3.4 - Check that the backsplash fits against the wall.
  • 3.5 - If adjustments are necessary, set the pencil compass to the span of the largest gap either between the backsplash and the wall or where the two corner sections meet.
  • 3.6 - Scribe a cutting line on the masking tape to mark the section to be removed.
  • 3.7 - Repeat for the remaining countertop sections.
  • 3.8 - Remove the clamps and use a belt sander or file to sand the backsplash to the line drawn with the compass.
  • 3.9 - Set the countertop sections on the cabinets to verify the fit.
4

Join countertop sections

  • 4.1 - Lay countertop sections on the cabinet boxes. Make sure you can access the counter from below. If not, you will have to pre-assemble countertop sections.
  • 4.2 - Apply a bead of silicone caulking to one end of a countertop section and press the two ends together.
  • 4.3 - Insert the mitre bolts in their factory cut slots.
  • 4.4 - Tighten the bolts closest to the inside corner.
  • 4.5 - Verify that the countertop surface is flat and that the join is aligned and level. Protect the counter with a cloth and tap on a piece of wood to adjust the join.
  • 4.6 - When you are satisfied with the adjustments, tighten all the bolts under the counter.
  • 4.7 - Remove excess caulking.
5

Secure the countertop to the cabinets

  • 5.1 - Ensure the backsplashes are flush with the wall and the countertop is in its final position.
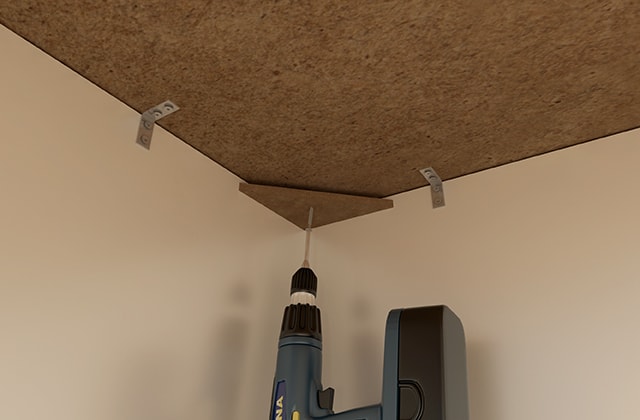
  • 5.2 - Screw down the countertops. Make sure screws are long enough to go through the cabinet and into the countertop but not through the countertop surface.
  • 5.3 - Screw in from below while maintaining pressure from above, from the countertop down.
  • 5.4 - Screw into the corner strips or cabinet boxes, or use metal squares and #8 5/8" screws.
  • 5.5 - Screw all the base cabinets.
  • 5.6 - Remove all dust along the seam between the backsplash and wall.
  • 5.7 - Use caulking to fill any spaces between the backsplash and wall.

Pro Tip

For a smooth silicone seam, first dip your finger in soapy water then slide it over the seam immediately after the silicone application.