Install a kitchen faucet

A new faucet is a serious upgrade for your kitchen. And when it comes to style and functionality, you really can have it all. The hardest part? Removing the old one, but this project tells you exactly what to do, step-by-step. Installation of your new faucet is definitely DIY and does not require specialized tools. There is such a wide range to choose from, and your only consideration should be matching your existing sink. When it comes to functionality, you’ll want to look at a variety of pull-out faucets and retractable spray heads. Kitchen sinks never had it so good!
Difficulty level: Easy
Duration: 2 hours
Match your new faucet to your sink
Verify the number of holes on the sink; standard sinks generally have between one and four holes.

Measure the center-to-center distance separating the two mounting holes. This distance is called the spread and should be either 4" or 8", both standard measurements.

If you are also replacing the sink, install the faucet first.
1

Remove the old faucet

  • 1.1 - Turn off the water supply by shutting the hot and cold stop valves under the sink. If your installation does not include valves, turn off the water to the entire house.
  • 1.2 - Unplug the waste disposer.
  • 1.3 - Put a bucket under the sink.
  • 1.4 - Open the faucets to relieve pressure and water in the lines.
  • 1.5 - Use an adjustable wrench to disconnect the supply lines from the faucet to the hot and cold valves.
  • 1.6 - Use a basin wrench to unscrew the locknut holding the faucet on the sink.
  • 1.7 - If there is any rust, spray with a lubricant. Wait a few minutes then loosen.
  • 1.8 - Remove the faucet from the sink.
  • 1.9 - Scrape away old sealant from the surface of the sink with a plastic putty knife.
  • 1.10 - Clean and dry the surface.
  • 1.11 - If your plumbing system does not include supply valves, install them now. Choose supply valves according to the type of connectors.
    • Copper: compression-fitting valves to welded fittings because they are easier to work with
    • PVC: press-joining (push-fit fitting over the pipe)
  • 1.12 - If it has not already been done, replace the rigid connectors (PEX or copper) with flexible connectors.
2

Insert the faucet base

  • 2.1 - If your faucet has a base, run a ¼" bead of sealant to the underside.
  • 2.2 - Press down firmly to ensure the sealant adheres well to the base and provides a watertight joint. Remove excess sealant around the base.
  • 2.3 - Make sure the base of the faucet is parallel to the back of the sink.
  • 2.4 - Insert the body of the faucet into the designated hole on the sink.
  • 2.5 - Slide the metal mounting washer up to the top of the body of the faucet. Verify that the flexible connectors are positioned properly.
  • 2.6 - Insert and hand-tighten the mounting nut to maintain the washer in place.
  • 2.7 - Make sure the faucet is lined up properly.
  • 2.8 - Tighten the nut with a wrench.
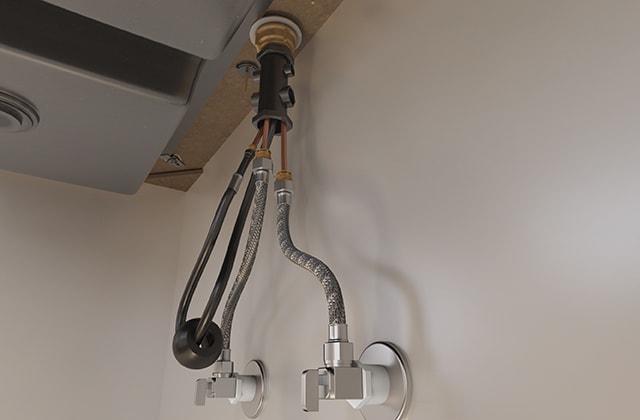
  • 2.9 - Depending on the model, screw in the hose protector to the end of the rod to reduce the friction to the flexible hose.
  • 2.10 - Connect the ends of the flexible hot and cold-water connectors to the stop valve.
  • 2.11 - Hand screw then tighten nuts with a wrench.

Pro Tip

To ensure enough room for the pull-down faucet to move freely, secure the surplus of the two hot and cold-water flexible connectors to the back of the cabinet.
3

Connect the retractable hose and spray head

  • 3.1 - Depending on the model, insert one end of the retractable flexible hose in the faucet opening.
  • 3.2 - Remove the protective cap.
  • 3.3 - Insert the hose-weight around the spray hose.
  • 3.4 - Connect the spray hose to the valve adaptor under the faucet.
  • 3.5 - Pull on the spray hose to verify that it is properly attached.
  • 3.6 - An 8" x 8" area should be free of any obstruction to permit the hose to move freely.
  • 3.7 - Pull on the spray hose to verify that it retracts properly under the sink.
  • 3.8 - Turn off the faucet, and depending on the model, remove the spray head to test whether it is working properly.
  • 3.9 - Turn on the hot and cold-water supplies.
  • 3.10 - Let the hot and cold water run for 15 seconds to flush the lines.
  • 3.11 - Check all connections for tightness, and retighten if necessary.
  • 3.12 - Remove the protective cap from the spray head.
  • 3.13 - Check that the gasket and aerator are positioned correctly.
  • 3.14 - Screw the end of the spray head to the retractable hose.

Suggested products