Install a handle or lockset for the exterior door

Let our experts show you how to properly install a handle and lockset on your exterior door, and post a warning to all burglars at the same time! This a straightforward project that can be completed fairly quickly. How much you want to spend is completely up to you: although handles and locks come in a variety of models for all tastes and budgets, the installation process is essentially the same.

Measuring

If you plan to replace an existing handle and lock, there is no need to drill new holes. However, you must note the measurements when choosing door handles and locks to ensure the new set will fit the existing holes.

  • Measure the thickness of your door
  • Measure the distance between the holes for the handle and lock, center to center.
  • Measure the diameter of the holes
  • Measure the distance between the hole for the handle where the spindle is inserted and the screw hole on the bottom of the handle. If the length is not the same, the old holes will be exposed and will require filling and may still be visible.

If you are installing an exterior door, choose the handle and lock at the same time. When you place your order, the manufacturer will drill the necessary holes in the appropriate places.

If you are buying a new door and the holes are not pre-drilled, use the template provided by the lock manufacturer to ensure holes are drilled correctly.

Installation

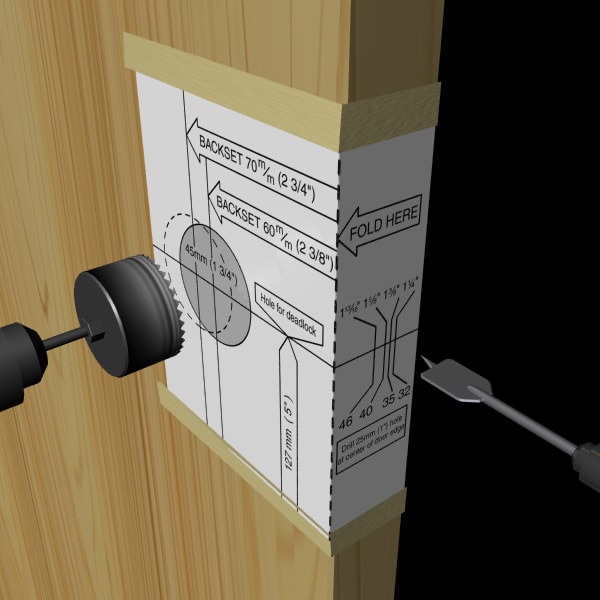
The template included with the new handle is a sheet of paper indicating where to drill to install your deadbolt lock. Before you start, use the template to compare the dimensions of the holes on the lock and handle.

1

Drill holes for the handle and deadbolt

  • 1.1 - Place the lock template on the door. Use masking tape to maintain in place.
  • 1.2 - Check the size of the hole saw on the template, then insert into your drill.
  • 1.3 - Drill or enlarge the holes where indicated.
  • 1.4 - Take care: the drill must be perfectly level to square the hole.
  • 1.5 - For a clean cut, drill from one side only until the hole saw touches through the other side, then drill from the other side.
  • 1.6 - Insert a flat boring bit in your drill, first referring to the template for the correct size.
  • 1.7 - Place the drill bit on the door jamb (side of the door) and drill the hole for the deadbolt. Keep the drill level to square the hole.
  • 1.8 - Drill through to the lock hole. Repeat these steps for the hole for the handle, if necessary.
  • 1.9 - Use sandpaper to smooth the edges of the holes.
2

Chisel out the area for the faceplate

The faceplate is a rectangular metal sheet that surrounds the deadbolt and latch bolt and sits flush with the door.
  • 2.1 - Insert the bolt into the lateral hole of the door.
  • 2.2 - Use a pencil to draw a line around the contour of the faceplate on the jamb. Withdraw the bolt.
  • 2.3 - Use a wood chisel to mark the contour of the line.
  • 2.4 - Score parallel lines ¼" apart within the contour.
  • 2.5 - Hold the chisel at an angle, approximately 45°, with the angled edge pressed into the wood, and press to remove the wood. Continue until the faceplate fits.
  • 2.6 - Repeat for the other bolt, if necessary.
3

Install the deadbolt lock

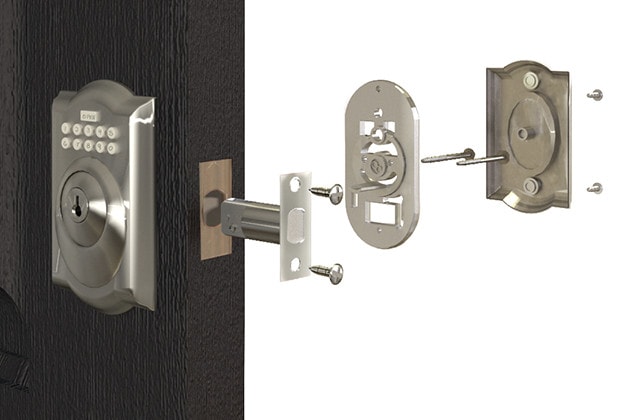
  • 3.1 - Slide the deadbolt into the lateral hole.
  • 3.2 - Insert the lock piece with the lock cylinder and keypad through the exterior hole.
  • 3.3 - Add the plate and turnpiece through the inside.
  • 3.4 - Insert the mounting screws through the latch mechanism.
  • 3.5 - Screw in the two pieces.
4

Install the handle

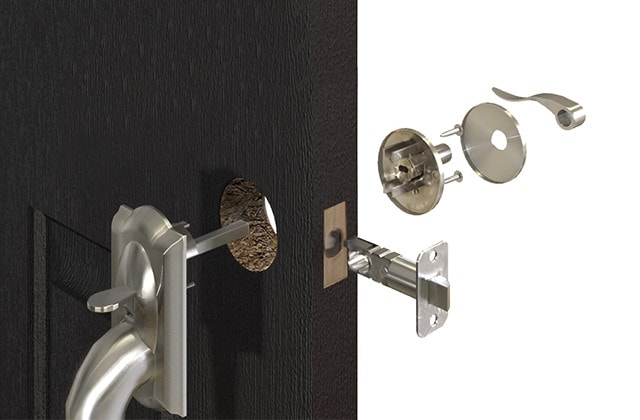
  • 4.1 - Slide the latch bolt into the lateral hole.
  • 4.2 - Place the exterior handle aligned with the opening on the exterior of the door.
  • 4.3 - From the inside, add the mounting plate and the handle by inserting the spindle assembly into the latch mechanism.
  • 4.4 - Fasten the mounting screws.
  • 4.5 - Fasten the screws for the latch mechanism.
5

Chisel out the area for the strike plate and drill the mortise.

The strike plate is a rectangular metal plate on the door frame, and the mortise is the hole holding the bolt that locks the door.
  • 5.1 - Dust the tip of the latch with chalk.
  • 5.2 - Close the door and mark the spot where the latch touches the door frame.
  • 5.3 - Place the strike plate on the door jamb and draw a line around the contour.
  • 5.4 - Cut the mortise with a chisel or router.
  • 5.5 - Replace the strike plate and check that it is aligned and sits flush with the door frame.
  • 5.6 - Mark the hole for the latch and remove the strike plate.
  • 5.7 - Use a 7/8" spade bit to drill the hole for the latch.
  • 5.8 - Screw in the strike plate.
  • 5.9 - Check that the door opens and closes properly

Suggested products

See all handles and Locks